How to Setup Mysql Replication on Ubuntu 18.04 (Master-Slave)
Home Blog DevOps How to Setup Mysql Replication on Ubuntu 18.04 (Master-Slave)
How to Setup Mysql Replication on Ubuntu 18.04 (Master-Slave)
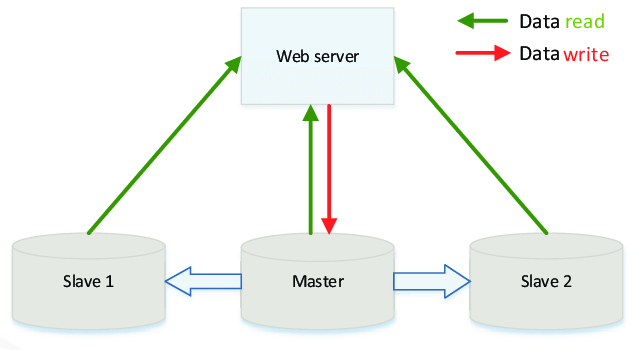
Master-slave replication was the very first replication option for MySQL database. It assumes that you have a single Master server that accepts both reads and writes and one or more read-only Slave servers. Data from the master server are asynchronously replicated to Slave servers.
Pros
- It is very fast as doesn’t impose any restrictions on performance.
- You can split read and write requests to different servers. For example, all analytics queries can be made on Slave nodes.
Cons
- It is not very reliable because of asynchronous replication. It means that some committed on master transactions may be not available on slave if the master fails.
- Write requests can hardly be scaled. The only option to scale write requests is to increase compute capacity (RAM and CPU) of the Master node.
- Failover process is manual in a general case. You should take care of promotion replica node to master one.
Building Time
You will need two vps.(Master server & Slave server)
Step 1. Edit & Modify the Configuration file of MySql Server.
# nano /etc/mysql/mysql.conf.d/mysqld.cnf
bind-address = 127.0.0.1
#comment this line if you want to remotely access your server
Add below lines at the end of the file.
server-id = 1
log_bin = /var/log/mysql/mysql-bin.log
log_bin_index =/var/log/mysql/mysql-bin.log.index
relay_log = /var/log/mysql/mysql-relay-bin
relay_log_index = /var/log/mysql/mysql-relay-bin.index
Step 2. Restart Mysql Server.
# service mysql restart
Step 3. Login to Mysql Server.
# mysql -u root -p
Step 4. Create a new user for Replication & specify the Password to that user.
mysql > create user 'replica'@'%' identified by 'password';
mysql > GRANT REPLICATION SLAVE ON *.* TO 'replica'@'%';
mysql > FLUSH PRIVILEGES;
Step 5. Execute below command to view the File & Position of Master Server.
mysql > show master status;

Login to Slave Server.
Step 6. Edit & Modify the Configuration file of MySql Server.
nano /etc/mysql/mysql.conf.d/mysqld.cnf
# bind-address = 127.0.0.1
Add below lines at the end of the file.
server-id = 2
log_bin = /var/log/mysql/mysql-bin.log
log_bin_index =/var/log/mysql/mysql-bin.log.index
relay_log = /var/log/mysql/mysql-relay-bin
relay_log_index = /var/log/mysql/mysql-relay-bin.index
Step 7. Restart Mysql Server.
# service mysql restart
Step 8. Login to Mysql Server.
# mysql -u root -p
Step 9. Specify the following details as given below & make sure to Replace the following settings with your settings.
MASTER_HOST     :   IP Address of Master server
MASTER_USER     :   Replication User of Master server that we had created in previous steps.
MASTER_PASSWORD :   Replication User Password of Master server that we had created in previous steps.
MASTER_LOG_FILE :   Your Value of Master Log File of Master server.
MASTER_LOG_POS  :   Your Value of Master Log Position of Master server.
mysql > stop slave;
mysql > CHANGE MASTER TO MASTER_HOST = 'master-ip', MASTER_USER = 'replica', MASTER_PASSWORD = 'passwordofyour', MASTER_LOG_FILE = 'mysql-bin.000001', MASTER_LOG_POS = 753;
mysql > start slave;
Now you can view the connection with the following commands.
mysql > show slave status\G;
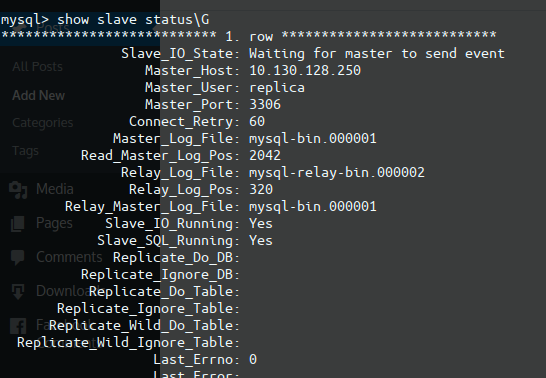
Important thing is check your firewall to allow mysql.
If you see the following, you did master-slave replication.
Slave_IO_Running: Yes
Slave_SQL_Running: Yes
Testing
Login to Master Server.
Step 10. Login to Mysql Server
# mysql -u root -p
Step 11. For testing a Replication we need to create a new database, it will automatically replicate on Slave Server.
mysql > create database demo;
Login to Slave Server.
Step 12. Login to Mysql Server
# mysql -u root -p
Step 13. View your Replicated Database by using below command.
mysql > show databases;
I think you will understand well!!!.